
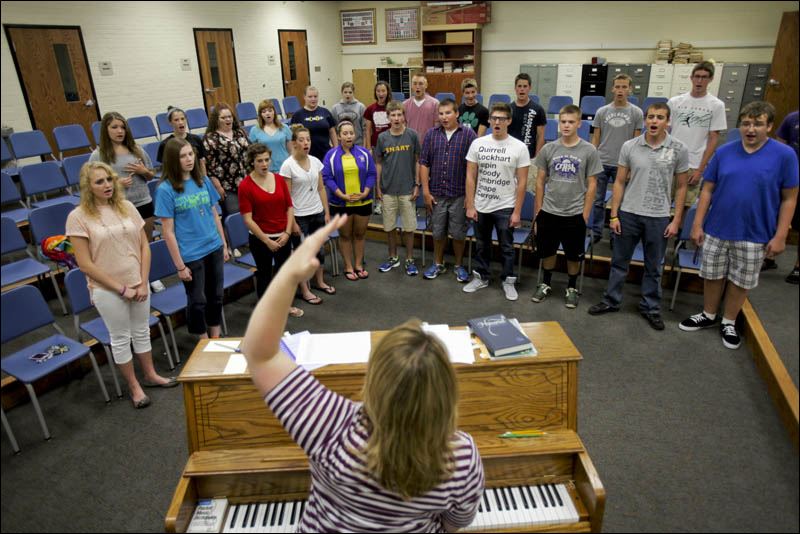
In several weeks, students will flood the choir room (because you have followed Randy Kilpatrick’s advice on recruiting). They will be eager and ready to join this ministry called Youth Choir. Examining their energetic faces you realize, “this is wonderful, but how am I going to make a decent sounding choir out of this group?”
For me, it starts with the “voicing” process—figuring out what voice part each student needs to sing. Now there are many ways to do this. Perhaps you have your tried and true method of finding the right voice section for your students. I remember my first go at this. I had no idea what I was doing, and a good friend of mine (experienced middle school teacher) explained her process for this. I listened intently and soaked in every detail of the explanation. I have made some tweaks here and there, but I still use this process because it works with a large group in a short amount of time. Many of us do not have the schedule to be able to listen to each student individually—frankly, I think most students that might consider youth choir (having never sung before) would be scared off by the thought of singing by themselves in front of you. That confidence only comes with time. I share this process with you today in hopes that it will alleviate some of the mystery or chaos that comes with trying to get everyone singing in the best place.
First, a few disclaimers:
1.) Initially, I worried that the students travel in clusters and want to sing in the same section as with their group of friends. This is true and a valid concern. I will address it near the end.
2.) You might not have the numbers to have a perfectly balanced choir. That’s ok and, honestly, to be expected. It is a very rare situation that any church student choir has well-balanced voice parts. It’s simply a matter of working with what you have and maximizing their individual contribution.
3.) Numbers may fluctuate over the course of the month/semester. Some will drop (hopefully not though) and new students will come that heard about student choir after the kick-off. Make adjustments as necessary.
4.) There is an ethical reason for doing this. These students are in your care. It is your job to care for them, and that includes their voice. The goal is to place students into a section that fits their voice comfortably (as much as possible though they are untrained and vocally immature).
5.) Remember, for the adolescent female voice, there are really no true altos or sopranos; they are all mezzo-sopranos. You will hear some girls say they can’t sing soprano. What they typically are saying is that they can only sing in chest voice and are not comfortable using their head voice. Over the course of the first semester, you should work on that with the women through a few targeted warm-ups.
6.) You will have new singers join the next week and throughout the year. (Yes, think positively.) I find that they probably come with a friend, so go ahead and let them sing with their friend. You will have the core of your sections established, which gives you a little more freedom in placing individuals after the fact.
In the absence of a visual demonstration where I show you how to do this, here’s a “12-step program” explaining how to do this.
Here we go:
1.) Structure that first practice to include time to divide into groups according to gender. Set a time limit of maybe 15-20 minutes, and then rotate the groups. One gender will stay with you to do voicing while the other gender goes somewhere else with another adult leader (maybe student pastor) to do get-to-know-you games or something else fun.
2.) Have your first meeting with the girls. Line them up shoulder to shoulder in one long row, in multiple rows, or in a circle. Then have them all sing “My Country ‘Tis of Thee” (key of F or Gb) together. Now, I’ve noticed that fewer and fewer students know this song, unfortunately. If it seems that they don’t know it, then use “Happy Birthday” (key of G) or “Row, Row, Row Your Boat” (key of Db). You want them all singing a song that they know well. Now you have established the song together as a group. Tell them that they are going to start singing this again in a moment and that you are going to walk around listening very carefully to them. Tell them that they might or might not get tapped (by you) while they are singing. Don’t give any other details. Keep the explanation very generic. Ask them to keep track of when they are tapped.
3.) Pitch the song in a lower key (down by a major/minor 3rd), and ask them to sing the song over and over as a group until you stop them. While they sing, simply walk around the room and listen to them. Then walk very slowly in front of them individually while they continue to sing. If you are in multiple rows, make sure you have room to walk in front of them. Don’t ever stop; just walk slowly. When you hear that an individual is doing well in all parts of the range, has a pleasant voice, and sounds confident, then you simply tap that person on the shoulder. When you have heard the entire group, ask them to stop.
4.) Now put the song of choice into a much higher key—up a major/minor 3rd from the original key. Repeat this process from number 3, walking around the room and listening very intently. For girls that have a pleasant, unforced tone that is confident or pleasing, simply tap them on the shoulder. When you have heard the entire group, ask them to stop.
5.) Now ask the girls to get into 4 separate groups: no taps, tapped only the 1st time, tapped only the 2nd time, tapped both times.
6.) From your four groups, take those that sang well on the lower version (tapped 1st time) and create your alto section. Take those that sang well on the higher version (tapped the 2nd time) and create your soprano section.
7.) From the “no tap” group and “tapped both times” groups, evenly divide them among the alto and soprano sections. The idea is that you have an equal split of experienced singers (tapped both times) and inexperienced singers (not tapped) in both sections.
8.) This is where the issue of friend groups comes in (mentioned above). As you are assigning girls in these last two groups to soprano/alto, consider those students that gravitate together. If you can ensure that each student has at least one person that they naturally connect with in their section, then that will be most helpful.
9.) Get the sections repositioned, and have each section sing the song in the original key to get a sense of balance between the two parts.
10.) Now, swap guys and girls. Have the girls go play games and the guys come for voicing. Most of us usually have fewer guys; so if possible, have them stand around the piano or in a circle with you in the middle. Guys seem to prefer the atmosphere that a huddle provides. Some steps of this are slightly different for the guys than girls.
11.) Read here if you have a 7th-12th grade choir. (If not jump to step 14.) Your intent is mainly to find changed, changing, and unchanged voices. I prefer to start with “Happy Birthday” but have them sing like are in the mall and trying to embarrass their friend who is having a birthday (singing loud and obnoxiously; it really frees the voice and any nervousness on their part). Keep it loose and fun. Have everyone sing together. With that spirit of singing, have them do it again and tell them that you are going to walk around and listen to them more carefully. Tell them they might or might not get tapped and to keep track of that.
12.) For the higher version (unchanged voices), do “My Country” in Bb or C starting at or below middle-C on the piano. Tell the guys to drop out if it is too high for them. For the lower version (changed voices), do “My Country” in the key of C (octave below middle C). Walk around each time and listen carefully, tapping those voices who fit comfortably in that specific range.
13.) Now separate the guys into 2 groups: tapped 1st time (unchanged voices) or tapped 2nd time (changed voices). In essence, these are your tenor and bass sections.
14.) Now go to the newly formed bass group and repeat the process. You want to find those guys that are changing voices or are somewhere in between a baritone/tenor because you will probably need to add some older guys to the tenor section. For finding higher voices, start “My Country” at A below middle-C. For finding lower voices, start “My Country” at C below middle-C. Walk around and listen during each version, tapping those who seem to be singing comfortably. Then separate out the groups: tapped 1st time (higher voice); tapped 2nd time (lower voice). Put those groups into your tenor and bass sections.
15.) By now, you should have two strong sections of guys placed appropriately. Keep in mind that for younger boys (7th/8th grade), their voices can move to a new phase in the changing process overnight, literally. Tell the guys that if they start getting uncomfortable while they are singing to talk to you. You will probably want to repeat this process again with the tenor section at the start of the spring semester to see who has changed or is in the process of changing.
16.) It looks as if the process for the guys takes twice as long, but remember you typically have fewer guys than girls. You want to be able to move fast during this whole process, so prepare your accompanist ahead of time so that you can stay moving among the students.
17.) Get the girls back together and sing “My Country” all together. Then I like to have them sing it in 2-part canon: girls start then guys start two bars later. Then we will do it in 4-part canon (SATB), with each voice part starting on the subsequent bar.
Please contact me if you have any questions.
Also, do you have any suggestions for this part of starting the new choir year? Please share!
Best wishes to a great new year!


